Introduction
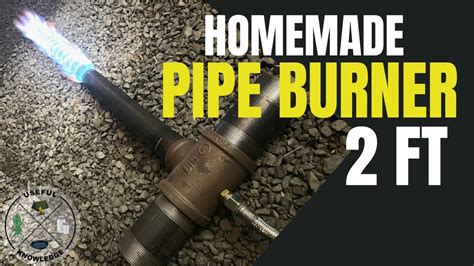
Hey there! I’m Jamie, and today I want to share with you a fun project I’ve been working on – a homemade venturi for a pipe burner. Venturis are essential components for gas-powered burners, and I’ll walk you through how I built one from scratch. So, let’s dive in and see how you can create your very own homemade venturi for your pipe burner.
Building a Homemade Venturi
I decided to embark on this project a couple of years ago when I realized how expensive purchasing venturis can be. Instead, I opted to create my own, and the results have been fantastic. With just a few materials and some handy work, you too can have a homemade venturi that works just as well, if not better, than store-bought ones.
Materials Needed
To get started, you’ll need a one and a quarter-inch black pipe, two four-inch black pipe nipples, a number 57 orifice, a bushing, a fender washer, a hose clamp, small screws, a nut, and a wingnut. These materials will serve as the foundation for your homemade venturi and allow you to control the airflow effectively.
Assembling the Venturi
The first step is to insert the orifice into the black pipe tee using a bushing to secure it in place. Then, attach the pipe nipples to the tee to form the main structure of the venturi. Next, add the air controller using the fender washer, nut, and wingnut to regulate the airflow as needed. This simple setup will allow you to adjust the air intake for optimal burner performance.
Testing the Homemade Venturi
With the venturi assembled, it’s time to put it to the test. Connect it to your pipe burner and observe how it functions. You can adjust the air control to see how it affects the burner’s flame, demonstrating the effectiveness of your homemade venturi in controlling airflow and enhancing burner efficiency.
Conclusion
Building your own homemade venturi for a pipe burner is a rewarding project that can save you money and provide a deeper understanding of burner mechanics. With just a few basic materials and some simple assembly, you can create a functional venturi that rivals commercially available options. So, next time you’re in need of a venturi for your burner, consider taking the DIY route for a fun and practical project.
**Related Questions:**
1. **Can a homemade venturi be as effective as a store-bought one?**
– Yes, with proper construction and setup, a homemade venturi can perform just as well, if not better, than a purchased one.
2. **What materials are essential for building a homemade venturi?**
– You will need a black pipe, pipe nipples, an orifice, a bushing, a fender washer, a hose clamp, small screws, a nut, and a wingnut.
3. **How can airflow be controlled in a homemade venturi?**
– Airflow can be regulated using an air controller comprised of a fender washer, nut, and wingnut, allowing for easy adjustment of the air intake.
4. **What is the significance of testing a homemade venturi with a pipe burner?**
– Testing the venturi with a burner allows you to observe its performance, including how it influences the flame and airflow, validating its effectiveness.
5. **What are the benefits of building a homemade venturi for a pipe burner?**
– Building a homemade venturi not only saves costs but also provides a hands-on learning experience and customization options for optimizing burner efficiency.